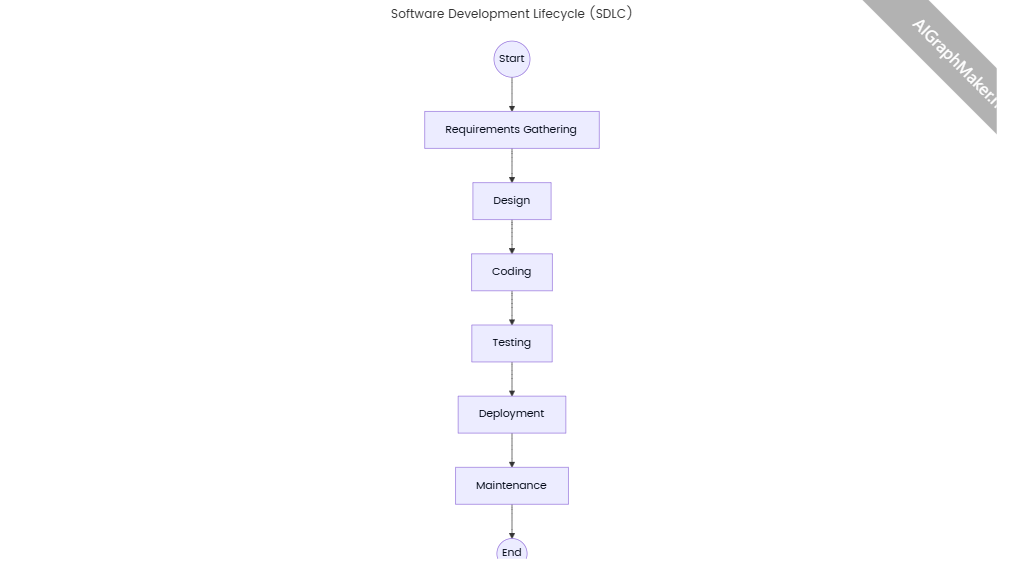
Here’s a detailed timeline with specific tasks for web development project management, structured into key phases and supported by technical insights from the search results:
1. Project Initiation & Planning
Timeframe: Weeks 1-2
Requirement Gathering: Conduct stakeholder interviews to define project goals, target audience, and functional/non-functional requirements (e.g., SEO compliance, responsive design).
Scope Finalization: Create a Project Requirements Document (PRD) with prioritized features (e.g., P0: payment integration, P1: user registration).
Resource Allocation: Assign roles (front-end developers, QA testers) and select technology stacks (e.g., React.js for frontend, Node.js for backend).
Risk Assessment: Identify potential risks (e.g., third-party API delays) and develop mitigation strategies.
2. Design & Prototyping
Timeframe: Weeks 3-4
Wireframing: Use tools like Figma or Axure to create low-fidelity wireframes for key pages (homepage, product pages).
UI/UX Design: Develop high-fidelity mockups with attention to accessibility and cross-device compatibility.
Client Review: Submit prototypes for stakeholder feedback and iterate until final approval.
3. Development Phase
Timeframe: Weeks 5-10
Frontend Development:
Build responsive layouts using HTML/CSS/JavaScript frameworks (e.g., Bootstrap).
Integrate APIs (e.g., payment gateways like Stripe) and ensure browser compatibility.
Backend Development:
Set up databases (e.g., MySQL or MongoDB) and develop RESTful APIs.
Implement authentication systems (OAuth 2.0) and server-side logic.
Version Control: Use Git for code collaboration and track changes via platforms like GitHub.
4. Testing & Quality Assurance
Timeframe: Weeks 11-12
Functional Testing: Validate core features (e.g., form submissions, checkout flow) using tools like Selenium.
Performance Testing: Optimize page load speed (target: <2s) and conduct stress tests with JMeter.
Security Audits: Scan for vulnerabilities (e.g., SQL injection, XSS) using OWASP ZAP.
5. Deployment & Launch
Timeframe: Week 13
Server Configuration: Deploy to cloud platforms (AWS, Azure) with load balancing and SSL encryption.
Content Migration: Transfer CMS content (e.g., WordPress) and ensure SEO metadata consistency.
Go-Live Checklist: Verify domain setup, analytics integration (Google Analytics), and backup systems.
6. Post-Launch & Maintenance
Timeframe: Ongoing
Monitoring: Track uptime (target: 99.9%) and user behavior via dashboards (e.g., Google Data Studio).
Bug Fixes & Updates: Address post-launch issues (e.g., broken links) and release feature enhancements.
Performance Reports: Generate monthly reports on traffic, conversion rates, and technical KPIs
Description
- Project Initiation & Planning
- Timeframe: Weeks 1 - 2
- Requirement Gathering: Conduct in - depth interviews with project stakeholders to define project goals, target audience, and functional and non - functional requirements. For example, ensure the project complies with SEO standards and achieves responsive design to provide an excellent user experience.
- Scope Finalization: Create a Project Requirements Document (PRD) and prioritize project features. For instance, set payment integration as the highest priority (P0) and user registration as the next priority (P1).
- Resource Allocation: Allocate project roles reasonably, such as front - end developers, QA testers, etc., and select the technology stack. For example, use the React.js framework for the front - end and Node.js for the back - end.
- Risk Assessment: Identify potential risks, such as possible delays in third - party API interfaces, and develop corresponding countermeasures to reduce the impact of risks on the project schedule.
- Design & Prototyping
- Timeframe: Weeks 3 - 4
- Wireframing: Use tools like Figma or Axure to create low - fidelity wireframes for key pages (such as the homepage and product pages) to initially structure the page layout.
- UI/UX Design: Based on the low - fidelity wireframes, design high - fidelity prototypes, paying attention to page accessibility and cross - device compatibility, ensuring a consistent and good visual effect and user experience across different screen sizes and devices.
- Client Review: Submit the designed prototypes to project stakeholders for review, collect feedback, and iterate repeatedly according to the feedback until final approval is obtained.
- Development Phase
- Timeframe: Weeks 5 - 10
- Frontend Development: Use HTML/CSS/JavaScript frameworks (such as Bootstrap) to build responsive page layouts, integrate various APIs (such as the Stripe payment gateway), and conduct strict testing to ensure browser compatibility.
- Backend Development: Set up databases (such as MySQL or MongoDB), develop RESTful API interfaces, implement authentication systems (such as OAuth 2.0), and establish server - side business logic to ensure the efficiency and security of data storage and processing.
- Version Control: Use Git for code collaboration management and track code changes through platforms like GitHub, which facilitates collaborative development among team members and ensures code consistency and traceability.
- Testing & Quality Assurance
- Timeframe: Weeks 11 - 12
- Functional Testing: Use tools like Selenium to comprehensively verify core functions (such as form submissions and checkout processes) to ensure that all functions operate as expected.
- Performance Testing: Optimize page load speed with a target of within 2 seconds, and use JMeter for stress testing to evaluate the system's performance under high - concurrency conditions, ensuring system stability and reliability.
- Security Audits: Use the OWASP ZAP scanning tool to detect potential vulnerabilities in the system (such as SQL injection and XSS attacks), and fix them in a timely manner to ensure system security.
- Deployment & Launch
- Timeframe: Week 13
- Server Configuration: Deploy the project to cloud platforms (such as AWS, Azure), configure load balancing and SSL encryption to ensure high system availability and the security of data transmission.
- Content Migration: Migrate content from the CMS (such as WordPress) and ensure the consistency of SEO metadata to avoid affecting the search engine optimization effect due to content migration.
- Go - Live Checklist: Carefully verify domain name settings, integration of analysis tools (such as Google Analytics), and the normal operation of backup systems to ensure a smooth project launch.
- Post - Launch & Maintenance
- Timeframe: Ongoing
- Monitoring: Use dashboards (such as Google Data Studio) to track the system's uptime (target: 99.9%) and user behavior in real - time, and identify potential problems promptly.
- Bug Fixes & Updates: Timely handle problems that occur after the launch (such as broken links), and release feature enhancements according to user feedback and business needs, continuously optimizing system performance and user experience.
- Performance Reports: Generate detailed monthly reports on traffic, conversion rates, and technical key performance indicators (KPIs) to provide data support for subsequent system optimization and business decision - making.Project Initiation & Planning
- Timeframe: Weeks 1 - 2
- Requirement Gathering: Conduct in - depth interviews with project stakeholders to define project goals, target audience, and functional and non - functional requirements. For example, ensure the project complies with SEO standards and achieves responsive design to provide an excellent user experience.
- Scope Finalization: Create a Project Requirements Document (PRD) and prioritize project features. For instance, set payment integration as the highest priority (P0) and user registration as the next priority (P1).
- Resource Allocation: Allocate project roles reasonably, such as front - end developers, QA testers, etc., and select the technology stack. For example, use the React.js framework for the front - end and Node.js for the back - end.
- Risk Assessment: Identify potential risks, such as possible delays in third - party API interfaces, and develop corresponding countermeasures to reduce the impact of risks on the project schedule.
- Design & Prototyping
- Timeframe: Weeks 3 - 4
- Wireframing: Use tools like Figma or Axure to create low - fidelity wireframes for key pages (such as the homepage and product pages) to initially structure the page layout.
- UI/UX Design: Based on the low - fidelity wireframes, design high - fidelity prototypes, paying attention to page accessibility and cross - device compatibility, ensuring a consistent and good visual effect and user experience across different screen sizes and devices.
- Client Review: Submit the designed prototypes to project stakeholders for review, collect feedback, and iterate repeatedly according to the feedback until final approval is obtained.
- Development Phase
- Timeframe: Weeks 5 - 10
- Frontend Development: Use HTML/CSS/JavaScript frameworks (such as Bootstrap) to build responsive page layouts, integrate various APIs (such as the Stripe payment gateway), and conduct strict testing to ensure browser compatibility.
- Backend Development: Set up databases (such as MySQL or MongoDB), develop RESTful API interfaces, implement authentication systems (such as OAuth 2.0), and establish server - side business logic to ensure the efficiency and security of data storage and processing.
- Version Control: Use Git for code collaboration management and track code changes through platforms like GitHub, which facilitates collaborative development among team members and ensures code consistency and traceability.
- Testing & Quality Assurance
- Timeframe: Weeks 11 - 12
- Functional Testing: Use tools like Selenium to comprehensively verify core functions (such as form submissions and checkout processes) to ensure that all functions operate as expected.
- Performance Testing: Optimize page load speed with a target of within 2 seconds, and use JMeter for stress testing to evaluate the system's performance under high - concurrency conditions, ensuring system stability and reliability.
- Security Audits: Use the OWASP ZAP scanning tool to detect potential vulnerabilities in the system (such as SQL injection and XSS attacks), and fix them in a timely manner to ensure system security.
- Deployment & Launch
- Timeframe: Week 13
- Server Configuration: Deploy the project to cloud platforms (such as AWS, Azure), configure load balancing and SSL encryption to ensure high system availability and the security of data transmission.
- Content Migration: Migrate content from the CMS (such as WordPress) and ensure the consistency of SEO metadata to avoid affecting the search engine optimization effect due to content migration.
- Go - Live Checklist: Carefully verify domain name settings, integration of analysis tools (such as Google Analytics), and the normal operation of backup systems to ensure a smooth project launch.
- Post - Launch & Maintenance
- Timeframe: Ongoing
- Monitoring: Use dashboards (such as Google Data Studio) to track the system's uptime (target: 99.9%) and user behavior in real - time, and identify potential problems promptly.
- Bug Fixes & Updates: Timely handle problems that occur after the launch (such as broken links), and release feature enhancements according to user feedback and business needs, continuously optimizing system performance and user experience.
- Performance Reports: Generate detailed monthly reports on traffic, conversion rates, and technical key performance indicators (KPIs) to provide data support for subsequent system optimization and business decision - making.